
Hello beautiful peoples!

Before I will start – just a quick note – this write-up includes Amazon links. However, I am not affiliated with Amazon, nor do I receive any commission from purchases made through these links. I’m simply sharing items I’ve bought in the past. I have never been sponsored by anyone, and I think it’s safe to say I probably never will be.
And now lets cut to the chase… Recently, in an effort to distract myself from the difficult events in our lives – ones I choose to keep private and close to my chest – I decided to install, test, and gradually configure a modern Linux desktop. This project keeps my mind occupied, helping me focus less on current events while also giving me something productive to do. It offers the potential for learning while, at the same time, providing me with a functional and somewhat customized Linux setup should I ever need an alternative – essentially, in case shit hits the fan and my Windows 11 24H2 installation craps itself.
My primary PC is an older Dell OptiPlex 7010 in a Small Form Factor case, upgraded with an Intel i7-3770 CPU and 32GB of DDR3 RAM. I also added an MSI GeForce RTX 3050 LP 6G OC graphics card with 6GB of GDDR6 memory – perfect for the occasional gaming session, as I’m known to enjoy a game or two in my spare time.
I love this machine, but it does have a few drawbacks – aside from being fairly old and a bit on the slower side these days. Since the case is a Small Form Factor (SFF), it has almost no internal space to work with. It features three SATA data ports, one of which is primarily designated for an optical disc drive. But given that it’s no longer 1992, I’ve replaced the optical drive with a 2.5″ SSD enclosure, allowing me to attach a third SSD and gain some much-needed storage space.
Would you believe me if I told you that after attaching three Crucial SSDs, totaling around 2TB, I had more than enough storage?
No? Fair enough… Turns out, I didn’t have enough storage after all.
This little write-up exists for a reason – I needed an extra drive to kickstart my Linux experiment, and since this PC has a metric butt-ton of USB ports, both front and back, I figured I might just as well put them to good use.
My “genius” plan was simple: grab one of my USB 3.0 to SATA cables and pair it with a spare SSD – nothing fancy, just 128GB or maybe 256GB, which should be more than enough. Plug it into the USB 3.0 port at the back of the case (the one oh-so-brilliantly marked with SS – and no, not the Schutzstaffel from the 1940s, but SuperSpeed).

With this setup, I should be able to install my Linux distro of choice onto an external SSD. Since USB 3.0 is far from the slowest of the USB standards, and an SSD isn’t spinning rust, speed shouldn’t be an issue. And because Linux is wonderfully… “compatible,” I could likely unplug my USB-attached SSD, connect it to another PC with the same cable, and still boot straight to the desktop – unless, of course, I run into some major hardware incompatibility.
I thought I’d go with something familiar – a system known for its stability and ease of use. Naturally, I chose Arch Linux…
Sorry… I thought I’d lighten the mood with a little joke. That said, to be fair, I used Arch Linux for many years as my go-to daily operating system – and I have to admit, it really was stable and easy to use. It was also a fantastic distribution that taught me a lot. The Arch Wiki was an incredible resource – an extensive library of knowledge that made learning Linux even more rewarding.
Debian – of course, I meant Debian or something Debian-based. So, I downloaded and verified the checksums for the latest Debian Stable, Debian Testing, Ubuntu, Ubuntu MATE, and a few other Linux images onto my 500GB Ventoy drive – and just like that, I was off to the races.
I started with the latest Ubuntu, figuring it was a good choice – after all, I’ve always liked its looks and appreciated its quality-of-life features, like easy Nvidia driver installation etc. But the installation failed. Three times. Every attempt crashed during the formatting of the / partition step. “Maybe the ISO got corrupted during copying.” I thought. I re-downloaded and verified the ISO – same result. “Alright… Ubuntu has pooped the bed.” So, I switched gears and tried Debian Testing instead – it’s Debian but without packages that feel like they’ve been sitting around since the 1960s. But Debian failed too – same issue during the installation: formatting of the root partition. I booted GParted ISO to format the drive manually, and it vanished mid-format. “Oh shugar… Maybe I finally killed the USB-to-SATA cable.” I found a replacement and continued my experiment. Turns out, the cable was fine – but the installation still failed. “Must be a bad SSD…” So, I swapped in another SSD – but even Debian 12 Stable wouldn’t install. At that point, it was clear – I had to dig deeper.
For some reason, I decided to install Ubuntu 22.04 – something told me that modern Debian-based ISOs were the root of the issue. And you know what? I was right. Ubuntu 22.04 installed correctly, and with the help of the do-release-upgrade command, I updated it to the latest version, which ran surprisingly well. However I was not happy with the look and feel of modern Ubuntu and on top of that those partitioning issues with Debian 13 Testing kept nagging at me – so I wasn’t ready to give up just yet.
I tried installing Debian 13 Testing again, but this time, when the installation failed during partitioning, I switched to another TTY and ran dmesg | less to view system messages more conveniently. That’s when I noticed some issues, which I quickly captured in a photo for reference.
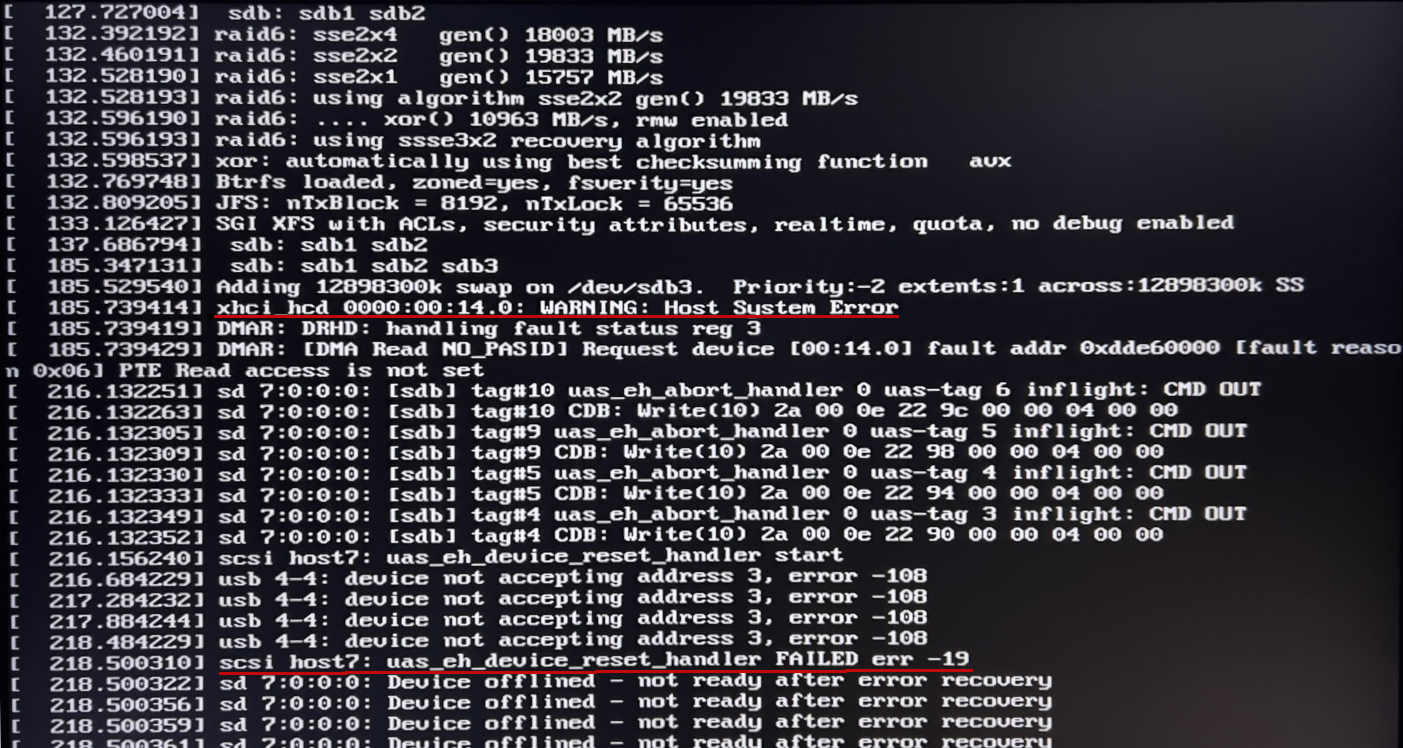
xhci_hcd 0000:00:14.0: WARNING: Host System Error
scsi host7: uas_eh_device_reset_handler FAILED err -19
Those errors suggested a problem with USB 3.0 handling and a communication failure between the USB controller and the SSD drive.
After powering down the machine, I booted into the latest Arch Linux distro – my go-to for diagnostics. Since it launches straight into the command line interface, it’s perfect for pulling system info efficiently. Its also very compatible and fast. Most of my favourite tools come pre-installed, though mc and htop are missing – but that’s an easy fix with an internet connection. Once Arch was up and running, I executed lsusb to scan all connected USB devices, allowing me to retrieve the vendor and product ID of the USB 3.0 to SATA controller. I snapped a photo to make things easier for myself. Having a visual reference allows me to quickly verify details without repeatedly running commands.

As You can see the Vendor ID is 174c and the Product ID is 55aa, it will be different in Your case.
Knowing this, to test my theory, I booted into the Debian 12 Stable installation. But this time, when I reached GRUB, I pressed e ![]() key on the keyboard to enter edit mode, allowing me to temporarily modify the boot parameters before proceeding. I then added
key on the keyboard to enter edit mode, allowing me to temporarily modify the boot parameters before proceeding. I then added usb-storage.quirks=174c:55aa:u to the end of the linux line, ensuring that any potential quirks with USB storage were accounted for. To make sure I could replicate this step in the future, I took a photo for my future self – just in case I ever needed to do it again.
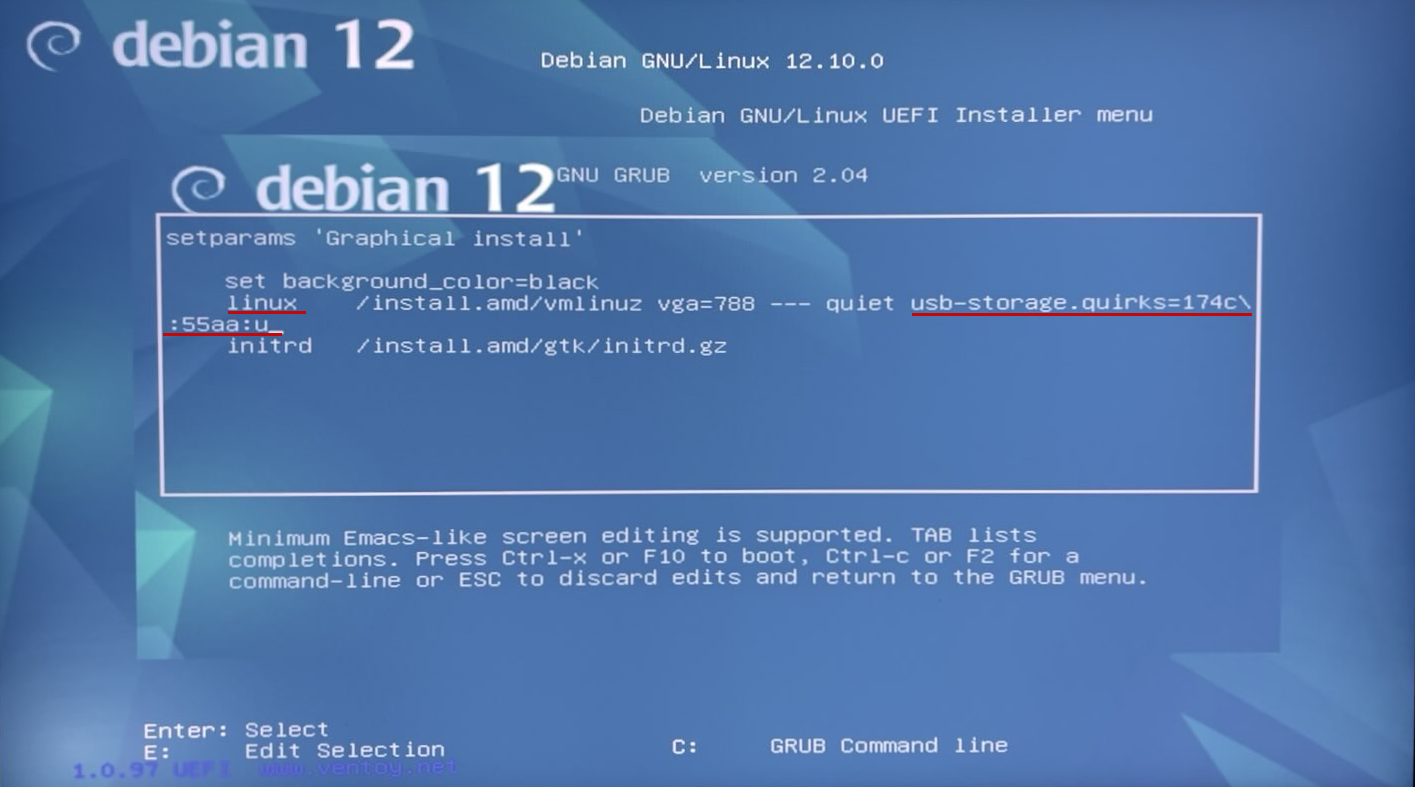
Noticed the \ after 174c? Just ignore it I didn’t type that in. GRUB uses it as a continuation character before a line break. Once everything was entered, I pressed F10 ![]() key on the keyboard to continue, and the system booted up successfully. Shortly after, I had a fully functional Debian 12 Stable installation. Since then, I’ve gone through reinstalling Ubuntu, Ubuntu MATE, and finally settled on Debian 13 Testing. The fix works, as long as it’s implemented correctly.
key on the keyboard to continue, and the system booted up successfully. Shortly after, I had a fully functional Debian 12 Stable installation. Since then, I’ve gone through reinstalling Ubuntu, Ubuntu MATE, and finally settled on Debian 13 Testing. The fix works, as long as it’s implemented correctly.

What does it do?
This added grub entry is basically a “special instruction” that tells the linux kernel: “Hey! This specific USB device (with ID 174c:55aa) needs a special rule when reading it. Treat it differently so things work correctly!”
If you encounter similar issues, first check the vendor ID and product ID of your USB device. Once you have those details, adjust the GRUB entry accordingly to ensure proper compatibility and functionality.
If you want to permanently add this to your installation’s GRUB, include it inside quotation marks (“”) in the GRUB_CMDLINE_LINUX line within /etc/default/grub.
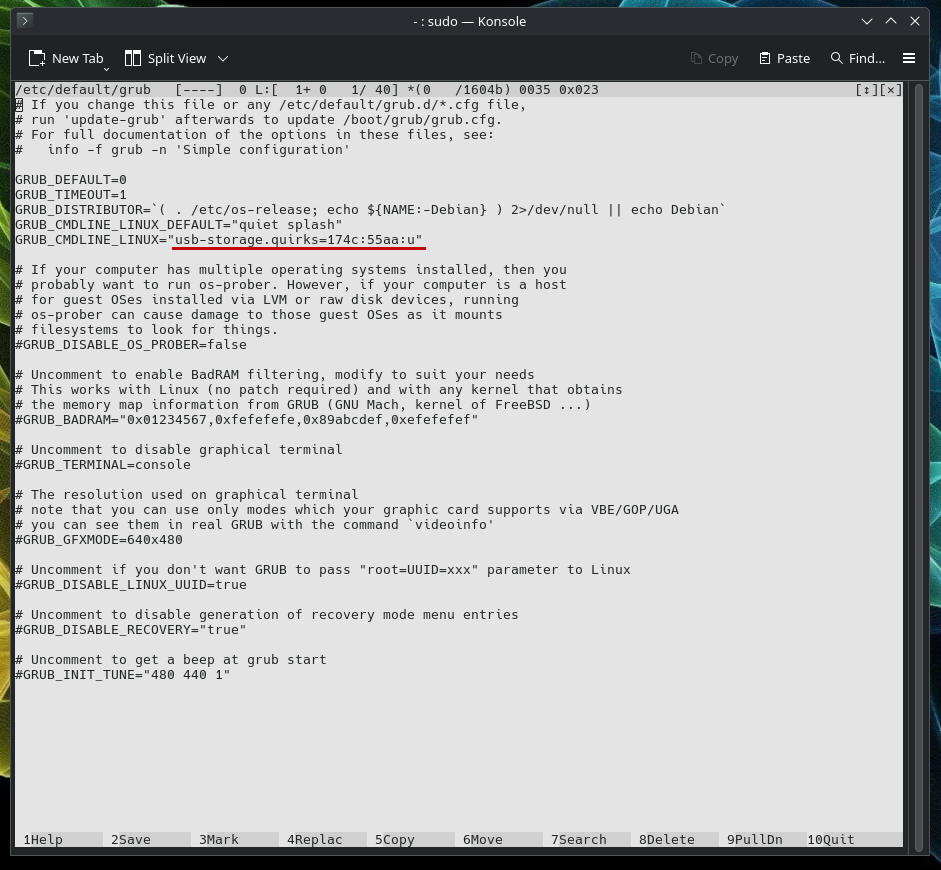
Save the file and then run 2 commands.
su -update-grub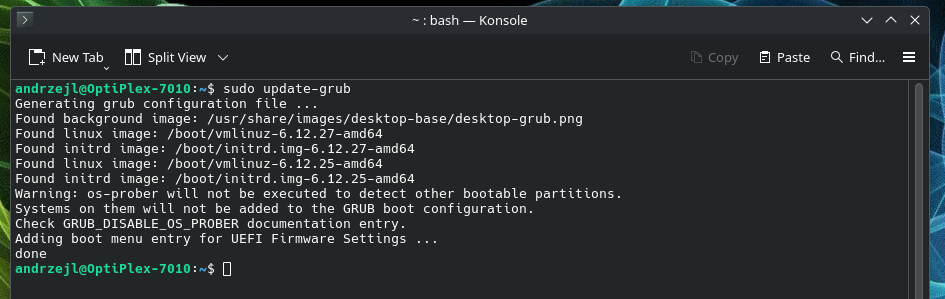
I hope this helps!
Catch you on the flip side,
AndrzejL


Pingback: [SOLVED] Debian 13 Testing: systemd-udevd[414]: /usr/lib/udev/rules.d/90-alsa-restore.rules:18 GOTO=”alsa_restore_std” has no matching label, ignoring. - Andrzej Langowski
Pingback: [SOLVED] Desktop Session: Plasma (Wayland) working correctly with proprietary #NVIDIA Drivers in Debian 13 Testing #Linux. Thanks Jase. - Andrzej Langowski
Pingback: [SOLVED] Windows vs. Linux: Resolving the Time Sync Conflict. - Andrzej Langowski
Pingback: [SOLVED] Enabling Snap Support in Discover Package Manager on Debian - Andrzej Langowski
Pingback: [SOLVED] Installing Signal Messenger on Debian Linux: A Quick Guide - Andrzej Langowski
Pingback: [SOLVED] Installing standalone Copilot-Desktop on Debian Linux: A Quick Guide - Andrzej Langowski
Pingback: [SOLVED] andrzejl is not in the sudoers file in Debian. - Andrzej Langowski
Pingback: [SOLVED] Installing Discord on Debian Linux: A Quick Guide - Andrzej Langowski